This PC Can't Run Windows 11? Find the Failing Check
Short answer: The message means at least one hardware check failed, but it doesn't say which. Press Win+R and run tpm.msc: 'Compatible TPM cannot be found' usually means the TPM is switched off in the BIOS (Intel PTT or AMD fTPM), not missing. Then run msinfo32 and read BIOS Mode and Secure Boot State: UEFI with Secure Boot Off is a single BIOS setting, while Legacy with Unsupported means the disk has to be converted from MBR to GPT first. If both of those pass, the processor isn't on Microsoft's supported list, and there is no setting that fixes that.
“This PC can’t run Windows 11” means one of the hardware checks failed, and the message doesn’t tell you which one. Two built-in tools do: tpm.msc shows whether the TPM is the problem, and msinfo32 shows whether it’s Secure Boot or the boot mode. If both of those pass, the processor is what’s blocking you. The fix is different for each, so check first and change settings second.
This matters more now than it did a year ago. Free Windows 10 security updates ended in October 2025, and the consumer Extended Security Updates program that covered home users finished on October 13, 2026. Even so, Statcounter still counted about 28% of desktop Windows PCs on Windows 10 in September 2026, and plenty of those are machines that fail this check.
Step 1: Run tpm.msc
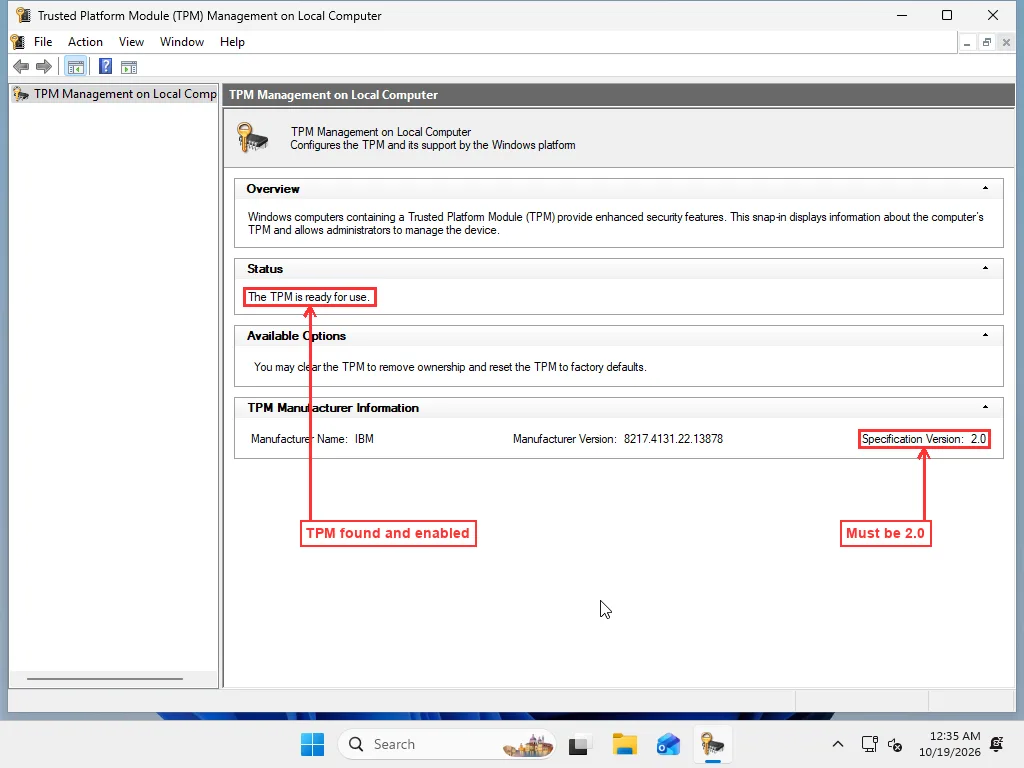
Press Win+R, type tpm.msc and press Enter. You’ll get one of two results.
The TPM is ready for use, with Specification Version 2.0 in the TPM Manufacturer Information box, means the TPM isn’t your problem. Go to step 2.
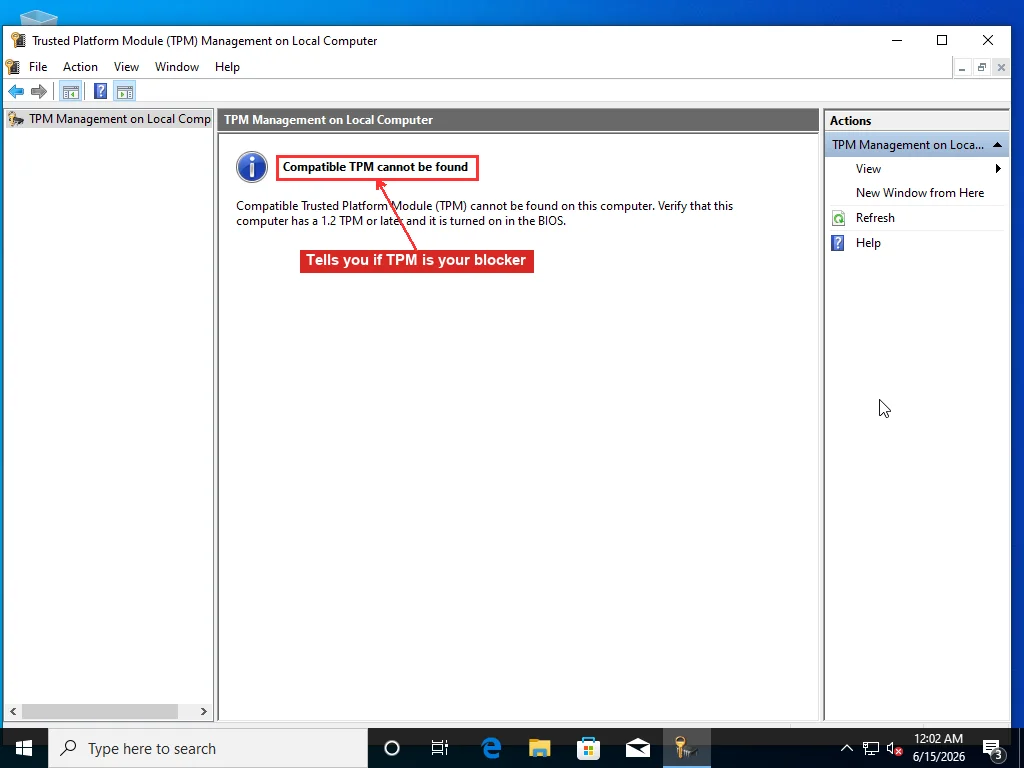
Compatible TPM cannot be found is the result most people get, and it rarely means the chip is missing. Most Intel and AMD processors from the last several generations have a firmware TPM built in, and many desktop motherboards shipped with it switched off. Microsoft’s own wording is that most PCs shipped in the last five years can run TPM 2.0.
Turning the TPM on
Restart into the BIOS/UEFI setup. The key is usually Del or F2 on desktops and F2, F10 or Esc on laptops, and this guide to opening the BIOS covers the Settings route if you keep missing the key. The option is normally under Security, Advanced or Trusted Computing, and the name depends on the platform:
| Platform | What the setting is usually called |
|---|---|
| Intel | Intel PTT, Intel Platform Trust Technology |
| AMD | AMD fTPM, AMD PSP fTPM, fTPM switch |
| Some OEM laptops and boards | Security Device, Security Device Support, TPM State |
Set it to Enabled, save, boot back into Windows and run tpm.msc again. Some boards show a one-time prompt at the next boot asking you to confirm a TPM change; accept it.
If you want to know whether there’s a TPM at all before rebooting, open Windows Security > Device security. A Security processor section means Windows can see a TPM. Click Security processor details to read its specification version. If that section isn’t there, the TPM is either disabled or not present, and the BIOS is the next place to look.
A board that offers only a TPM header for a plug-in module, with no PTT or fTPM option anywhere, really doesn’t have one. That machine is in the same position as one with an unsupported CPU (step 3).
Step 2: Run msinfo32
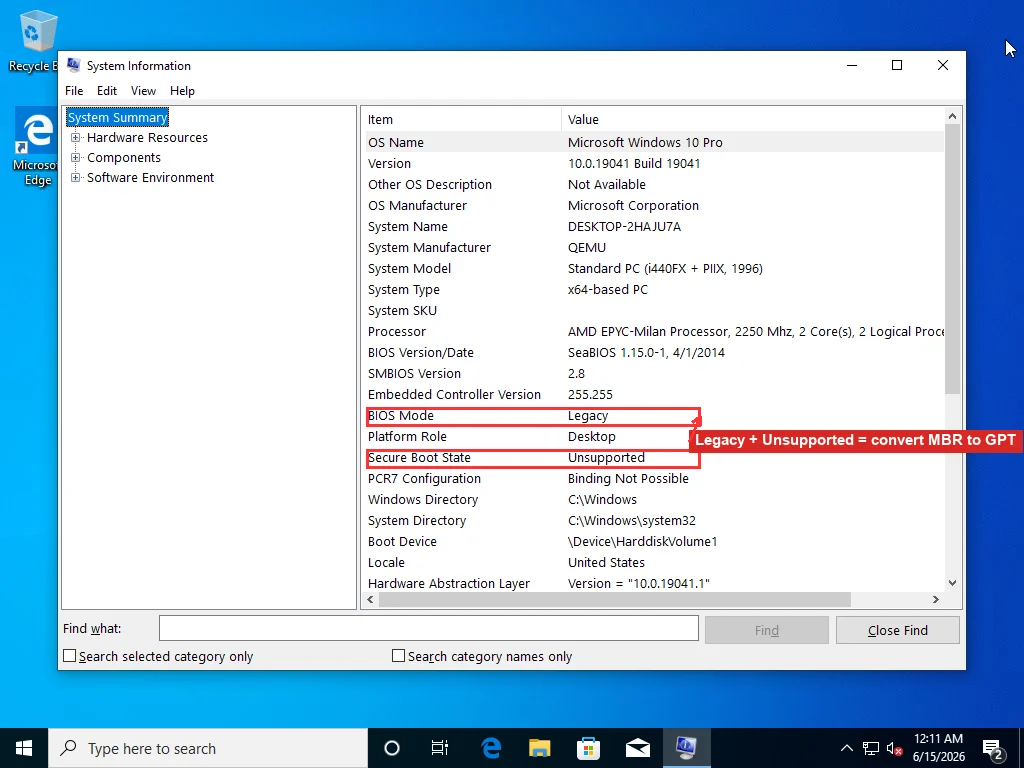
Press Win+R, type msinfo32 and press Enter. System Summary opens on the right. Find two lines:
- BIOS Mode: UEFI or Legacy
- Secure Boot State: On, Off or Unsupported
What the two lines mean together:
| BIOS Mode | Secure Boot State | What it means |
|---|---|---|
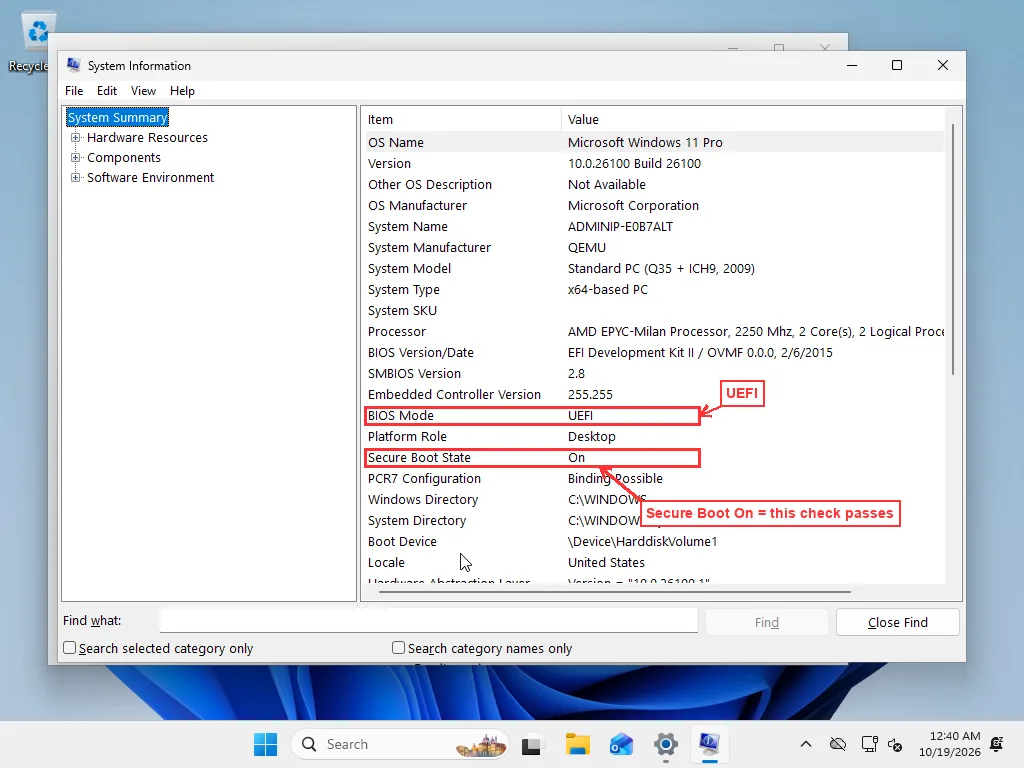
| UEFI | On | Secure Boot is fine |
| UEFI | Off | One BIOS setting: turn Secure Boot on |
| Legacy | Unsupported | Disk is MBR. Convert to GPT, switch to UEFI, then turn Secure Boot on |
UEFI with Secure Boot Off
In the BIOS, look under Boot or Security for Secure Boot and enable it. If it’s greyed out, look for CSM (Compatibility Support Module) or “Legacy support” and disable that first. Some boards also want the Secure Boot keys set to their factory defaults, an option usually called “Install default Secure Boot keys” or “Restore factory keys”. Save, boot into Windows, and check that msinfo32 now says On.
Legacy with Secure Boot Unsupported
This is the case that confuses people, because turning on Secure Boot in the BIOS does nothing. The disk Windows boots from uses the old MBR layout, and UEFI with Secure Boot needs GPT. Windows includes Microsoft’s MBR2GPT tool to convert it without wiping your files.
Back up the PC first. The conversion can’t be undone, and a failure halfway through leaves a disk that won’t boot either way. If BitLocker is on, suspend it before you start. Then open Command Prompt as administrator and check that the disk can be converted:
mbr2gpt /validate /disk:0 /allowFullOSIf it reports that validation completed successfully, run the conversion:
mbr2gpt /convert /disk:0 /allowFullOS/disk:0 assumes Windows is on disk 0, which is the case on most single-drive PCs. Disk Management shows the number if you have more than one drive. When the conversion finishes, restart into the BIOS, change the boot mode from Legacy/CSM to UEFI (otherwise the PC won’t find Windows), enable Secure Boot, and check msinfo32 again.
Validation usually fails because the disk already has four primary partitions, or because there’s no room for the EFI system partition MBR2GPT needs to create. At that point a clean install from USB is often less work than rearranging partitions, because Windows Setup creates the GPT layout itself.
Step 3: TPM and Secure Boot pass, but it still says no
Then the processor is the problem. Microsoft only supports processors on its published lists: in general, Intel 8th-generation Core and newer, and AMD Ryzen 2000 series and newer, with some exceptions in both directions. Open Task Manager, go to the Performance tab and click CPU to see the exact model, then look it up in Microsoft’s lists for Intel and AMD processors.
No BIOS setting changes this. The rest of the minimum spec (4 GB of RAM, 64 GB of storage, DirectX 12 graphics) is rarely the blocker on a PC that runs Windows 10 well, but msinfo32 shows Installed Physical Memory if you want to rule it out, and checking your RAM explains what the figures mean.
What about bypassing the check?
You’ll find plenty of ways to force Windows 11 onto hardware that fails: the AllowUpgradesWithUnsupportedTPMOrCPU registry value under HKLM\SYSTEM\Setup\MoSetup (it still needs at least TPM 1.2), LabConfig values typed in during setup, or a USB stick made with Rufus with the checks switched off. None of them help on very old processors: since version 24H2, Windows 11 won’t even boot on a CPU without the SSE4.2 and POPCNT instructions.
Microsoft’s position has hardened, though. Its page on Windows 11 on devices that don’t meet minimum system requirements says those PCs aren’t guaranteed updates, security updates included, and puts a watermark on the desktop. The installation guide now tells people who did it anyway to roll back to Windows 10 immediately. And Windows 10 stopped getting consumer security updates on October 13, 2026, so on an unsupported PC you’re choosing between two unpatched options. On a spare machine that’s a reasonable gamble. On the PC you use for banking or work, it isn’t.
When to get help
Two situations are worth handing over. One is a BIOS where the TPM or Secure Boot option is hidden under a name that doesn’t match anything above. The other is an MBR2GPT check that fails, when you’d rather not wipe the PC for a clean install. Our Windows installation service does this over a remote session: we check which requirement is failing, change the firmware settings with you, and convert the disk after a backup. An unsupported processor is different. No setting changes it, so the choice there is a new PC or an unsupported one.
Frequently Asked Questions
What does 'This PC can't run Windows 11' mean?
Windows Setup or PC Health Check found at least one hardware requirement your PC doesn't meet in its current configuration. The usual suspects are TPM 2.0, Secure Boot, UEFI boot mode and the processor. The first three are often settings that are simply turned off; the processor is the only one you can't change without new hardware.
Why does tpm.msc say 'Compatible TPM cannot be found'?
On most recent PCs the TPM is built into the processor's firmware and can be switched off in the BIOS, and when it's off Windows can't see it. Look for Intel PTT (Platform Trust Technology), AMD fTPM, Security Device Support or TPM State, enable it, save, and run tpm.msc again. It should then say 'The TPM is ready for use' with Specification Version 2.0.
What does BIOS Mode Legacy mean for Windows 11?
Windows is booting the old way from an MBR-partitioned disk. Secure Boot only works with UEFI boot, which is why msinfo32 shows Secure Boot State as Unsupported. Windows includes mbr2gpt to convert the system disk to GPT without wiping it; after that you switch the firmware to UEFI and turn on Secure Boot. Back up first, because the conversion can't be undone.
Can I install Windows 11 on an unsupported CPU?
It can be forced with registry changes or a modified installer, but Microsoft says such PCs aren't guaranteed updates, including security updates, and it now recommends rolling back to Windows 10 if you installed Windows 11 that way. Treat it as a stopgap, not a fix.
My Windows 10 PC can't upgrade. Is it still safe to use?
Windows 10 support ended in October 2025, and the consumer Extended Security Updates program ran until October 13, 2026. After that date a Windows 10 PC keeps working but no longer gets security fixes, so a machine that can't take Windows 11 should be kept off risky use or replaced.